Freemarker
freemarker介绍
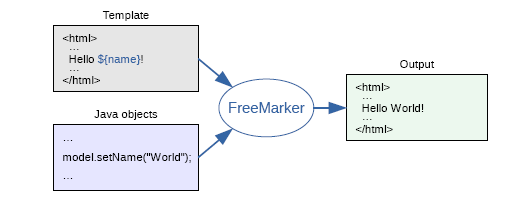
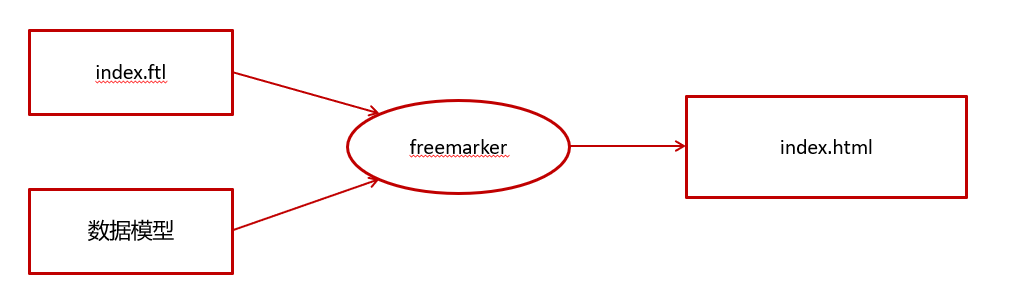
FreeMarker 是模板引擎:基于 模板-数据- -生成输出文本(网页-电子邮件配置文件-源代码)
是一嵌入开发产品的组件。
音乐社区案例
不使用freemarker
前端->发起请求->查询数据库->拿到数据->返回数据层->视图层渲染
使用freemarker
发起音乐->直接访问freemarker静态网页
在模板中,你可以专注于如何展现数据, 而在模板之外可以专注于要展示什么数据。
环境搭建
1.导入依赖
freemarker作为springmvc一种视图格式,默认情况下SpringMVC支持freemarker视图格式。
1
2
3
4
5
6
7
8
9
10
11
12
13
14
15
16
17
18
19
20
21
22
23
24
25
26
27
28
29
30
31
32
33
34
35
36
37
38
39
40
41
42
43
44
45
46
47
| <?xml version="1.0" encoding="UTF-8"?>
<project xmlns="http://maven.apache.org/POM/4.0.0"
xmlns:xsi="http://www.w3.org/2001/XMLSchema-instance"
xsi:schemaLocation="http://maven.apache.org/POM/4.0.0 http://maven.apache.org/xsd/maven-4.0.0.xsd">
<parent>
<artifactId>heima-leadnews-test</artifactId>
<groupId>com.heima</groupId>
<version>1.0-SNAPSHOT</version>
</parent>
<modelVersion>4.0.0</modelVersion>
<artifactId>freemarker-demo</artifactId>
<properties>
<maven.compiler.source>8</maven.compiler.source>
<maven.compiler.target>8</maven.compiler.target>
</properties>
<dependencies>
<dependency>
<groupId>org.springframework.boot</groupId>
<artifactId>spring-boot-starter-web</artifactId>
</dependency>
<dependency>
<groupId>org.springframework.boot</groupId>
<artifactId>spring-boot-starter-freemarker</artifactId>
</dependency>
<dependency>
<groupId>org.springframework.boot</groupId>
<artifactId>spring-boot-starter-test</artifactId>
</dependency>
<dependency>
<groupId>org.projectlombok</groupId>
<artifactId>lombok</artifactId>
</dependency>
<dependency>
<groupId>org.apache.commons</groupId>
<artifactId>commons-io</artifactId>
<version>1.3.2</version>
</dependency>
</dependencies>
</project>
|
1
2
3
4
5
| freemarker:
cache: false
settings:
template_update_delay: 0
suffix: .ftl
|
2.创建模型类
1
2
3
4
5
6
7
| @Data
public class Student {
private String name;
private int age;
private Date birthday;
private Float money;
}
|
3.创建模板
在resources下创建templates,此目录为freemarker的默认模板存放目录。
在templates下创建模板文件 01-basic.ftl ,模板中的插值表达式最终会被freemarker替换成具体的数据。
1
2
3
4
5
6
7
8
9
10
11
12
13
14
15
16
| <!DOCTYPE html>
<html>
<head>
<meta charset="utf-8">
<title>Hello World!</title>
</head>
<body>
<b>普通文本 String 展示:</b><br><br>
Hello ${name} <br>
<hr>
<b>对象Student中的数据展示:</b><br/>
姓名:${stu.name}<br/>
年龄:${stu.age}
<hr>
</body>
</html>
|
1
2
3
4
5
6
7
|
@SpringBootApplication
public class FreemarkerDemotApplication {
    public static void main(String[] args) {
      SpringApplication.run(FreemarkerDemotApplication.class,args);
    }
}
|
1
2
3
4
5
6
7
8
9
10
11
12
13
14
15
16
17
18
19
20
21
|
@Controller
public class HelloController {
@GetMapping("/basic")
public String test(Model model) {
model.addAttribute("name", "freemarker");
Student student = new Student();
student.setName("小明");
student.setAge(18);
model.addAttribute("stu", student);
return "01-basic";
}
|
Model 在 Spring MVC 中的作用是用于在控制器中传递数据到视图层(如 Thymeleaf、Freemarker 等模板引擎),使得视图可以通过模板语言读取并展示这些数据。
具体作用如下:
- 传递数据到视图层:
Model 是一个容器,可以存储从控制器传递给视图的参数。通过 model.addAttribute() 方法,你可以将数据添加到 Model 中,视图层可以访问这些数据进行渲染。例如,上述代码通过 model.addAttribute("name", "freemarker") 将 "freemarker" 传递给视图层,通过 model.addAttribute("stu", student) 传递 Student 实体对象。
- 数据在页面展示:视图层模板通过获取
Model 中的数据展示在页面上。例如,Freemarker 通过 ${name} 和 ${stu.name} 可以读取并显示控制器中传递的数据。
因此,Model 作为控制器与视图之间的桥梁,负责将数据从控制器传递到视图,用于动态生成页面内容。
访问
http://localhost:8881/basic
Freemarker基础
1.基础语法分类
1、注释,即<#– –>,介于其之间的内容会被freemarker忽略
2、插值(Interpolation):即 ${..} 部分,freemarker会用真实的值代替**${..}**
3、FTL指令:和HTML标记类似,名字前加#予以区分,Freemarker会解析标签中的表达式或逻辑。
4、文本,仅文本信息,这些不是freemarker的注释、插值、FTL指令的内容会被freemarker忽略解析,直接输出内容。
2.集合指令(List和map)
案例
1
2
3
4
5
6
7
8
9
10
11
12
13
14
15
16
17
18
19
20
21
22
23
24
25
26
27
28
29
30
31
32
33
34
| @GetMapping("/list")
public String list(Model model){
Student stu1 = new Student();
stu1.setName("小强");
stu1.setAge(18);
stu1.setMoney(1000.86f);
stu1.setBirthday(new Date());
Student stu2 = new Student();
stu2.setName("小红");
stu2.setMoney(200.1f);
stu2.setAge(19);
List<Student> stus = new ArrayList<>();
stus.add(stu1);
stus.add(stu2);
model.addAttribute("stus",stus);
HashMap<String,Student> stuMap = new HashMap<>();
stuMap.put("stu1",stu1);
stuMap.put("stu2",stu2);
model.addAttribute("stuMap", stuMap);
return "02-list";
}
|
模板:
1
2
3
4
5
6
7
8
9
10
11
12
13
14
15
16
17
18
19
20
21
22
23
24
25
26
27
28
29
30
31
32
33
34
35
36
37
38
39
40
41
42
43
44
45
46
47
48
49
50
51
52
53
54
55
56
57
58
59
60
61
62
63
64
65
66
| <!DOCTYPE html>
<html>
<head>
<meta charset="utf-8">
<title>Hello World!</title>
</head>
<body>
<#-- list 数据的展示 -->
<b>展示list中的stu数据:</b>
<br>
<br>
<table>
<tr>
<td>序号</td>
<td>姓名</td>
<td>年龄</td>
<td>钱包</td>
</tr>
<#list stus as stu>
<tr>
<td>${stu_index+1}</td>
<td>${stu.name}</td>
<td>${stu.age}</td>
<td>${stu.money}</td>
</tr>
</#list>
</table>
<hr>
<#-- Map 数据的展示 -->
<b>map数据的展示:</b>
<br/><br/>
<a href="###">方式一:通过map['keyname'].property</a><br/>
输出stu1的学生信息:<br/>
姓名:${stuMap['stu1'].name}<br/>
年龄:${stuMap['stu1'].age}<br/>
<br/>
<a href="###">方式二:通过map.keyname.property</a><br/>
输出stu2的学生信息:<br/>
姓名:${stuMap.stu2.name}<br/>
年龄:${stuMap.stu2.age}<br/>
<br/>
<a href="###">遍历map中两个学生信息:</a><br/>
<table>
<tr>
<td>序号</td>
<td>姓名</td>
<td>年龄</td>
<td>钱包</td>
</tr>
<#list stuMap?keys as key >
<tr>
<td>${key_index}</td>
<td>${stuMap[key].name}</td>
<td>${stuMap[key].age}</td>
<td>${stuMap[key].money}</td>
</tr>
</#list>
</table>
<hr>
</body>
</html>
|
3.if指令
freemarker在解析时遇到if会进行判断,条件为真则输出if中间的内容,否则跳过内容不再输出。
指定名字为小红的为红色
1
2
3
4
5
6
7
8
9
10
11
12
13
14
15
16
17
18
| <table>
<tr>
<td>姓名</td>
<td>年龄</td>
<td>钱包</td>
</tr>
<#list stus as stu>
<#if stu.name='小红'>
<tr style="color: red" >
<td >${stu.name}</td>
</tr>
</if>
<tr>
<td >${stu.name}</td>
</tr>
</#list>
</table>
|
4.运算符
1、算数运算符
FreeMarker表达式中完全支持算术运算,FreeMarker支持的算术运算符包括:
- 加法:
+
- 减法:
-运算符
- 乘法:
*
- 除法:
/
- 求模 (求余):
%
1
2
3
4
5
6
7
| <b>算数运算符</b>
<br/><br/>
100+5 运算: ${100 + 5 }<br/>
100 - 5 * 5运算:${100 - 5 * 5}<br/>
5 / 2运算:${5 / 2}<br/>
12 % 10运算:${12 % 10}<br/>
<hr>
|
除了 + 运算以外,其他的运算只能和 number 数字类型的计算。
2.比较运算符
=或者==:判断两个值是否相等. !=:判断两个值是否不等. >或者gt:判断左边值是否大于右边值 >=或者gte:判断左边值是否大于等于右边值 <或者lt:判断左边值是否小于右边值 <=或者lte:判断左边值是否小于等于右边值
1
2
3
4
5
6
7
8
| <#if "xiaoming" == "xiaoming">
字符串的比较 "xiaoming" == "xiaoming"
</#if>
</dd>
<dd>
<#if 10 != 100>
数值的比较 10 != 100
</#if>
|
- **
=和!=**可以用于字符串、数值和日期来比较是否相等
- **
=和!=**两边必须是相同类型的值,否则会产生错误
- 字符串
"x" 、**"x "** 、**"X"**比较是不等的.因为FreeMarker是精确比较
- 其它的运行符可以作用于数字和日期,但不能作用于字符串
- 使用**
gt等字母运算符代替>会有更好的效果,因为 FreeMarker会把>**解释成FTL标签的结束字符
- 可以使用括号来避免这种情况,如:
<#if (x>y)>
3.逻辑运算符
逻辑运算符只能作用于布尔值,否则将产生错误
1
2
3
4
5
6
7
8
9
10
11
12
| <b>逻辑运算符</b>
<br/>
<br/>
<#if (10 lt 12 )&&( 10 gt 5 ) >
(10 lt 12 )&&( 10 gt 5 ) 显示为 true
</#if>
<br/>
<br/>
<#if !false>
false 取反为true
</#if>
<hr>
|
4.空值处理
用法为:variable??,如果该变量存在,返回true,否则返回false
1
2
3
4
5
| <#if stus??>
<#list stus as stu>
......
</#list>
</#if>
|
${name!’’}表示如果name为空显示空字符串。
${(stu.bestFriend.name)!’’}表示,如果stu或bestFriend或name为空默认显示空字符串。
5.内建函数
内建函数语法格式: 变量+?+函数名称
1.某个集合的大小**
${集合名?size}
2.日期格式化
显示年月日: ${today?date}
显示时分秒:**${today?time}**
显示日期+时间:**${today?datetime}**
自定义格式化: ${today?string("yyyy年MM月")}
3.内建函数c
model.addAttribute(“point”, 102920122);
point是数字型,使用${point}会显示这个数字的值,每三位使用逗号分隔。
如果不想显示为每三位分隔的数字,可以使用c函数将数字型转成字符串输出
${point?c}
4.将json字符串转成对象
1
2
3
| <#assign text="{'bank':'工商银行','account':'10101920201920212'}" />
<#assign data=text?eval />
开户行:${data.bank} 账号:${data.account}
|
案例
1
2
3
4
5
6
7
8
9
10
11
12
13
14
15
16
17
18
19
20
21
22
23
24
25
26
27
28
29
30
31
32
33
34
35
36
37
38
39
40
41
| <!DOCTYPE html>
<html>
<head>
<meta charset="utf-8">
<title>inner Function</title>
</head>
<body>
<b>获得集合大小</b><br>
集合大小:${stus?size}
<hr>
<b>获得日期</b><br>
显示年月日: ${today?date} <br>
显示时分秒:${today?time}<br>
显示日期+时间:${today?datetime}<br>
自定义格式化: ${today?string("yyyy年MM月")}<br>
<hr>
<b>内建函数C</b><br>
没有C函数显示的数值:${point} <br>
有C函数显示的数值:${point?c}
<hr>
<b>声明变量assign</b><br>
<#assign text="{'bank':'工商银行','account':'10101920201920212'}" />
<#assign data=text?eval />
开户行:${data.bank} 账号:${data.account}
<hr>
</body>
</html>
|
静态化测试
不需要springmvc0将freemarker作为视图解析器
需要使用Freemarker原生Api来生成静态内容
1
2
3
4
5
6
7
8
9
10
11
| erver:
port: 8881
spring:
application:
name: freemarker-demo
freemarker:
cache: false
settings:
template_update_delay: 0
suffix: .ftl
template-loader-path: classpath:/templates
|
1
2
3
4
5
6
7
8
9
10
11
12
13
14
15
16
17
18
19
20
21
22
23
24
25
26
27
28
29
30
31
32
33
34
35
36
37
38
39
40
41
42
43
44
45
46
47
48
49
50
51
52
53
54
55
56
| @SpringBootTest(classes = FreemarkerDemoApplication.class)
@RunWith(SpringRunner.class)
public class FreemarkerTest {
@Autowired
private Configuration configuration;
@Test
public void test() throws IOException, TemplateException {
Template template = configuration.getTemplate("02-list.ftl");
Map params = getData();
template.process(params, new FileWriter("d:/list.html"));
}
private Map getData() {
Map<String, Object> map = new HashMap<>();
Student stu1 = new Student();
stu1.setName("小强");
stu1.setAge(18);
stu1.setMoney(1000.86f);
stu1.setBirthday(new Date());
Student stu2 = new Student();
stu2.setName("小红");
stu2.setMoney(200.1f);
stu2.setAge(19);
List<Student> stus = new ArrayList<>();
stus.add(stu1);
stus.add(stu2);
map.put("stus", stus);
HashMap<String, Student> stuMap = new HashMap<>();
stuMap.put("stu1", stu1);
stuMap.put("stu2", stu2);
map.put("stuMap", stuMap);
return map;
}
}
|
项目实践
音乐社区详情页面
创建模版
炫技术项目-需要用到这个技术栈-本人前端也没写过模版很简陋
1
2
3
4
5
6
7
8
9
10
11
12
13
14
15
16
17
18
19
20
21
22
23
24
25
26
27
28
29
30
31
32
33
34
| <html>
<head>
<title>${dataModel["music"].musicName}</title>
</head>
<body>
<#if dataModel["music"].likes gt 100>
<h1 style="color: red">${dataModel["music"].musicName}</h1>
</#if>
<h1 >${dataModel["music"].musicName}</h1>
<br>
<h3>点赞:</h3>
<h3>${dataModel["music"].likes}</h3>
<h2>${dataModel["music"].comments}</h2>
<br><br>
<button onclick="playMusic(music.fileLocation)">播放音乐</button>
<script>
function playMusic(fileId) {
var musicUrl = '/mp3/' + fileId;
var audio = new Audio(musicUrl);
audio.play();
}
</script>
</body>
</html>
|
2.生成静态页面
1
2
3
4
5
6
7
8
9
10
11
12
13
14
15
16
17
18
|
try {
Template template = configuration.getTemplate("02-list.ftl");
Map<String, Object> dataModel = new HashMap<>();
dataModel.put("music", onlineMusic);
StringWriter out = new StringWriter();
template.process(dataModel, out);
InputStream is = new ByteArrayInputStream(out.toString().getBytes());
fileStorageService.uploadHtmlFile("",onlineMusic.getMusic()+".html",is);
}catch (Exception e)
{
throw new BusinessException(500,"静态化失败");
}
|
白菜代售详情页
具体页面
1
2
3
4
5
6
7
8
9
10
11
12
13
14
15
16
17
18
19
20
21
22
23
24
25
26
27
28
29
30
31
32
33
34
35
36
37
38
39
40
41
42
43
44
45
46
47
48
49
50
51
52
53
54
55
56
57
58
59
60
61
62
63
64
65
66
67
68
69
70
71
72
73
74
75
76
77
78
79
80
81
82
83
84
85
86
87
88
| <!DOCTYPE html>
<html lang="zh-CN">
<head>
<meta charset="UTF-8">
<meta name="viewport" content="width=device-width, initial-scale=1.0">
<title>商品详情</title>
<style>
body {
font-family: Arial, sans-serif;
}
.container {
width: 100%;
padding: 20px;
}
.price {
font-size: 24px;
color: red;
}
.details, .status, .transaction, .account-info, .extra-info {
margin: 20px 0;
}
.status, .transaction {
background-color: #f5f5f5;
padding: 10px;
}
.button {
background-color: red;
color: white;
padding: 10px;
text-align: center;
margin: 10px 0;
border-radius: 5px;
}
</style>
</head>
<body>
<div class="container">
<h2>商品详情</h2>
<div class="price">¥${price}</div>
<div class="details">
<p>${productCode} 号 【${productName}】 ${productDesc}</p>
<p>${views} 人看过</p>
</div>
<div class="status">
<p>卖家实名: ${sellerStatus}</p>
<p>交易时间: ${tradeTime}</p>
<p>保障: ${guarantee}</p>
</div>
<div class="transaction">
<h3>交易流程</h3>
<ul>
<#list transactionSteps as step>
<li>${step}</li>
</#list>
</ul>
</div>
<div class="account-info">
<h3>账号信息</h3>
<p>荣耀典藏: ${gloryCount}</p>
<p>皮肤数: ${skinCount}</p>
<p>信用评分: ${creditScore}</p>
</div>
<div class="extra-info">
<p>有无防沉迷: ${antiAddiction}</p>
<p>实名情况: ${realNameStatus}</p>
<p>能否人脸包赔: ${faceGuarantee}</p>
</div>
<div class="button">
<p><a href="consult.html">咨询客服</a></p>
<p><a href="buy.html">立即购买</a></p>
</div>
</div>
</body>
</html>
|
1
2
3
4
5
6
7
8
9
10
11
12
13
14
15
16
17
18
19
| Map<String, Object> dataModel = new HashMap<>();
dataModel.put("price", "1500");
dataModel.put("productCode", "CG5BM");
dataModel.put("productName", "小国标垂悬虎");
dataModel.put("productDesc", "贵族6 皮肤价 值:59808 荣耀典藏0 传说皮肤3 史诗皮肤31 英雄皮肤103 传奇王者");
dataModel.put("views", "36");
dataModel.put("sellerStatus", "已完成实名认证");
dataModel.put("tradeTime", "00:00~23:00");
dataModel.put("guarantee", "可买包赔");
dataModel.put("transactionSteps", Arrays.asList("下单", "验号", "换绑", "合同签署", "完成交易"));
dataModel.put("gloryCount", "0.0");
dataModel.put("skinCount", "103.0");
dataModel.put("creditScore", "可排位");
dataModel.put("antiAddiction", "无防沉迷");
dataModel.put("realNameStatus", "可二次实名");
dataModel.put("faceGuarantee", "支持人脸包赔");
//来自模拟数据-具体类无法贴出
|
1
2
3
4
5
6
7
8
9
10
11
12
13
14
15
16
17
18
19
20
21
22
|
try {
Template template = configuration.getTemplate("wzry.ftl");
Map<String, Object> dataModel = new HashMap<>();
dataModel.put("wzry", wzry);
dataModel.put("tupian", scdtp);
StringWriter out = new StringWriter();
template.process(dataModel, out);
InputStream is = new ByteArrayInputStream(out.toString().getBytes());
fileStorageService.uploadHtmlFile("",onlineMusic.getMusic()+".html",is);
}catch (Exception e)
{
throw new BusinessException(500,"静态化失败");
|