Spring boot探究
Springboot复习
0.Spring不同
Spring Framework 是一个全面的编程和配置模型,为基于 Java 的企业应用提供了一个全方位的基础设施支持。Spring 处理了 Java 应用的基础建设,如事务管理、依赖注入、面向切面编程等。
Spring MVC 是 Spring 的一个模块,用于构建 Web 应用程序。Spring MVC 遵循 MVC(模型-视图-控制器)-vue 设计模式,并提供了一套丰富的功能来建立可扩展的动态 Web 应用。使用 Spring MVC,开发者需要配置大量的组件,如视图解析器、消息转换器、数据绑定器等,这些都需要在 Spring 的配置文件中明确设置。
Spring Boot
自动配置:自动配置 Spring 应用程序的大部分常用设置,尽可能减少开发者的配置代码。
启动器依赖:提供了一系列的“启动器”依赖项来简化 Maven 配置。
内嵌服务器:如 Tomcat、Jetty 或 Undertow,默认不需要部署 WAR 文件。
运行独立应用:支持打包为 jar,并通过
java -jar运行应用程序。操作和管理功能:提供生产级别的特性如健康检查、度量信息统计及外部配置。
区别
配置:Spring MVC 需要详细的配置,包括 URL 到控制器方法的映射、视图解析等,而 Spring Boot 则提供自动配置,极大简化了这一过程。
启动:Spring MVC 需要部署到一个外部的 Web 应用服务器,如 Tomcat 或 Jetty,而 Spring Boot 提供了内嵌的服务器,简化了部署和分发过程。
项目依赖:Spring Boot 采用了起步依赖的概念,可以通过这些预先设定的依赖来简化构建配置。
1.Springboot启动类分析
springboot-简化了开发-比如-我们之前导入依赖–到需要自己写配置类-返回Bean
springboot 帮我们简化了这个工程
SpringBoot提供了一种快速使用Spring的方式,基于约定优于配置的思想
spring 缺点 1.配置繁琐 2.依赖繁琐
springboot -1.自动配置 2.起步依赖 3.辅助功能
再起步依赖中导入了很多依赖 这使得我们不需要一个个找版本
//引导类
1 | |
启动类探究
启动类(通常是带有
@SpringBootApplication注解的类)是整个应用的入口点,负责启动并配置 Spring 应用的运行环境。1. 启动 Spring 应用上下文
启动类通过调用
SpringApplication.run()方法来启动 Spring 应用上下文(Application Context)。Spring 应用上下文是 Spring 管理的所有 Bean、配置和依赖注入的核心。具体步骤包括:
扫描组件:启动类会触发组件扫描(Component Scan),自动发现并注册使用诸如
@Component、@Service、@Controller等注解的 Bean。加载配置:读取项目中的配置文件(如
application.properties或application.yml),并应用相应的配置。初始化 Bean:启动 Spring IoC 容器,管理 Bean 的生命周期,包括创建、依赖注入、初始化和销毁。
2. 自动配置
Spring Boot 的核心之一是自动配置(Auto Configuration),启动类会启动自动配置机制:@EnableAutoConfiguration
@SpringBootApplication 注解包含了 @EnableAutoConfiguration
它告诉 Spring Boot 根据类路径中的依赖项、配置文件中的属性等来自动配置应用程序。
- 例如,如果类路径中有
spring-boot-starter-web依赖,Spring Boot 会自动配置 Tomcat 作为嵌入式服务器,并配置 Spring MVC 的相关 Bean。
3. 启用嵌入式服务器
在传统的 Spring MVC 应用中,应用需要打包成 WAR 文件并部署到外部的应用服务器(如 Tomcat、Jetty 等)。而在 Spring Boot 中,启动类会启动嵌入式服务器(如嵌入式的 Tomcat、Jetty 或 Undertow),这使得应用可以独立运行,不依赖外部的容器环境。
- 启动类通过调用
SpringApplication.run()方法自动启动嵌入式服务器,并运行 Web 应用,这就是为什么你可以直接用java -jar来运行一个 Spring Boot 应用。4. 管理外部配置
Spring Boot 提供了一种灵活的方式来管理应用程序的配置,启动类会加载并管理这些外部配置:
- 启动类会加载默认的
application.properties或application.yml配置文件。- 如果需要,可以通过命令行参数或环境变量来覆盖配置。
5. 支持生产级别特性
Spring Boot 的启动类还会为应用程序自动启用一些生产环境的特性,如:
健康检查(Actuator):提供运行时的健康检查、度量指标等。
外部化配置:通过环境变量或命令行参数来外部化配置。
安全性:默认提供了基础的安全配置,可以进行扩展。
6.简化应用启动过程
启动类通过
@SpringBootApplication注解,大大简化了应用的启动配置。该注解实际上是以下三个注解的组合:
@SpringBootApplication
等价于:
@Configuration:表示该类可以用作 Spring 的 Java 配置类,代替传统的 XML 配置文件。@EnableAutoConfiguration:启用自动配置,基于类路径中的依赖项和配置来自动创建 Spring Beans。@ComponentScan:启用组件扫描,默认扫描该类所在的包及其子包,自动发现并注册 Spring 组件。
启动 Spring 应用上下文,初始化所有的 Spring 组件和依赖注入。
启用自动配置,根据项目的依赖自动配置应用所需的 Bean 和配置。
启动嵌入式服务器,使得应用可以直接运行,不依赖外部服务器。
管理外部配置,从配置文件、环境变量等地方加载应用的配置。
简化开发,通过 @SpringBootApplication 注解减少手动配置。
2.起步依赖分析
1.继承父工程
1 | |
⚫ 在spring-boot-starter-parent中定义了各种技术的版本信息,组合了一套最优搭配的技术版本。
2.导入起步依赖
1 | |
在各种starter中,定义了完成该功能需要的坐标合集,其中大部分版本信息来自于父工程。 ⚫ 我们的工程继承parent,引入starter后,通过依赖传递,就可以简单方便获得需要的jar包,并且不会存在 版本冲突等问题。
->
1 | |
1 | |
->追到底-最后继承的父pom
1 | |
-这里面规范了大量的依赖版本
3.配置文件读取
1.配置文件了解
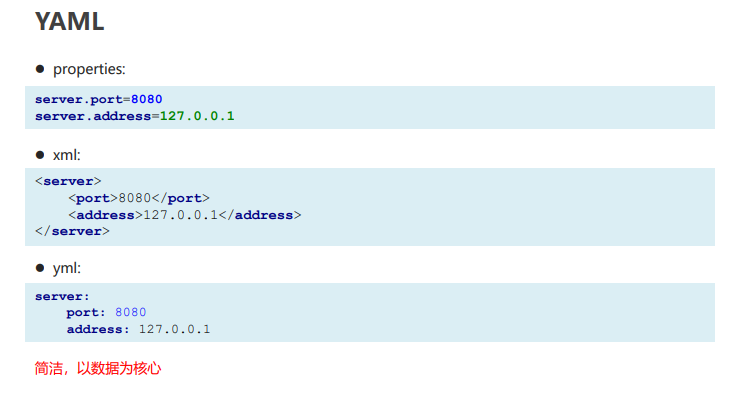
SpringBoot是基于约定的,所以很多配置都有默认值,但如果想使用自己的配置替换默认配置的话,就可以使用 application.properties或者application.yml(application.yaml)进行配置。
properties: server.port=8080
yml: server: port: 8080
在同一级目录下优先级为:properties > yml > yaml
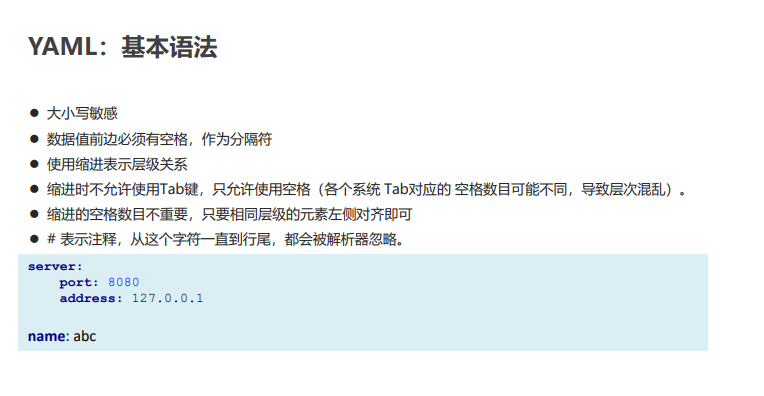
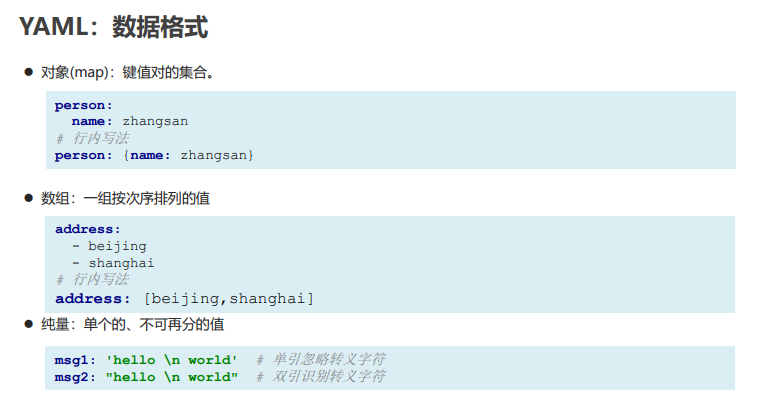
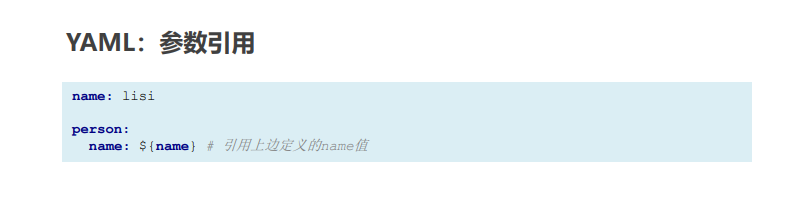
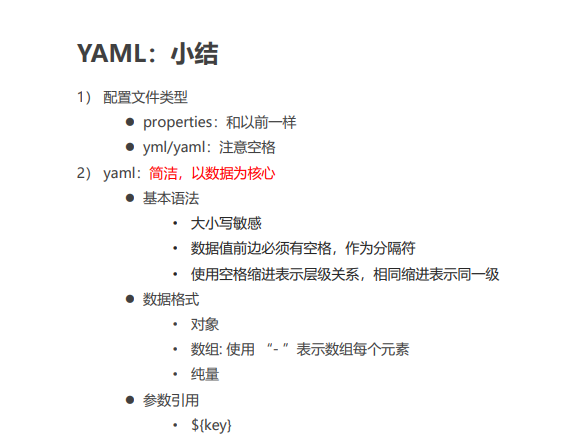
2.yaml
yaml-是一种数据序列化格式-知识的它具有丰富的跨平台性
对比
语法
3.读取配置文件内容
1.读取大类
@Value
@Value 注解用于将配置文件中的单个属性注入到 Spring Bean 中,适合用于简单的配置读取。
1 | |
1 | |
Environment
Environment接口用于访问 Spring 环境中的属性和配置,提供了一种灵活的方式来读取配置文件中的属性,适用于动态读取或者需要条件处理的场景。
1 | |
**env.getProperty()**:通过 Environment 获取属性值,支持动态读取。
如果属性不存在,返回 null。
适合动态获取配置属性。
灵活性更高,尤其适合条件性的属性获取。
可用于编写较复杂的配置处理逻辑。
@ConfigurationProperties
1 | |
1 | |
- **
@ConfigurationProperties(prefix = "app")**:指定配置项的前缀,所有以app开头的属性都会映射到AppConfig类中。- 自动将配置属性注入到对应的类属性中。
特点
- 适合批量处理和嵌套配置,配置项较多时使用更加方便。
- 需要配合 Spring Boot 的
@EnableConfigurationProperties或自动配置来启用。
总结
**@Value**:适合注入单个或少量配置属性,语法简单直观。
**Environment**:适合动态读取属性或者在运行时根据条件获取属性。
**@ConfigurationProperties**:适合批量读取属性,将多个配置项封装为对象,便于管理复杂的配置结构。
对于少量的简单配置,使用
@Value更直接。当需要动态获取配置时,使用
Environment提供了灵活性。如果需要处理大量配置或复杂结构的配置,
@ConfigurationProperties是最佳选择。
2.profile
多配置文件切换-比如我们生产环境-每一套生产环境有对应的配置文件
配置方式
profile配置方式 ⚫
多profile文件方式:提供多个配置文件,每个代表一种环境。
• application-dev.properties/yml 开发环境
• application-test.properties/yml 测试环境 •
application-pro.properties/yml 生产环境
激活方式
⚫ 配置文件: 再配置文件中配置:spring.profiles.active=dev
⚫ 虚拟机参数:在jVM options 指定:-Dspring.profiles.active=dev
⚫ 命令行参数:java –jar xxx.jar –spring.profiles.active=dev
3.内部加载顺序
Springboot程序启动时,会从以下位置加载配置文件:
- file:./config/:当前项目下的/config目录下
- file:./ :当前项目的根目录
- classpath:/config/:classpath的/config目录
- classpath:/ :classpath的根目录 加载顺序为上文的排列顺序,高优先级配置的属性会生效
加载顺序为上文的排列顺序,高优先级配置的属性会生
Spring-整合框架
1.Spring 整合junit
1.导入依赖-springboot 工程
2.编写测试类
3.添加注解
Spring JUnit 是 Spring 框架和 JUnit 测试框架的结合,常用于测试 Spring 应用中的组件、服务和数据访问层。JUnit 是一个流行的 Java 测试框架,帮助开发者编写和运行单元测试,而 Spring 提供了丰富的依赖注入、事务管理等功能。
当使用 Spring 和 JUnit 进行测试时,通常会结合 Spring 的测试支持类,例如
@SpringBootTest、@ContextConfiguration等注解,它们帮助你在测试中加载 Spring 应用上下文,方便测试 Spring 组件的行为。常用注解和功能
- @SpringBootTest: 用于启动整个 Spring 应用上下文,可以测试多个组件之间的交互。
- @ContextConfiguration: 指定 Spring 配置文件或类,用于加载应用上下文。
- @MockBean: 用于在测试中模拟 Spring Bean。
- @Before: 在每个测试方法执行之前运行,用于初始化测试环境。
- @Test: 用于标记测试方法。
通过结合 JUnit 和 Spring,你可以轻松地测试 Spring 应用中的各个部分,包括控制器、服务、DAO 等。
1 | |
2.Spring 整合redis
① 搭建SpringBoot工程
② 引入redis起步依赖
③ 配置redis相关属性
④ 注入RedisTemplate模板
⑤ 编写测试方法,测试
redis-键值存储
1 | |
3.spring 整合myBatis
1 | |
放入依赖mapper-哦、配置文件放入配置
搭建SpringBoot工程
② 引入mybatis起步依赖,添加mysql驱动
③ 编写DataSource和MyBatis相关配置
④ 定义表和实体类
⑤ 编写dao和mapper文件/纯注解开发
⑥ 测试
Spring boot高级
1.Spring 启动流程
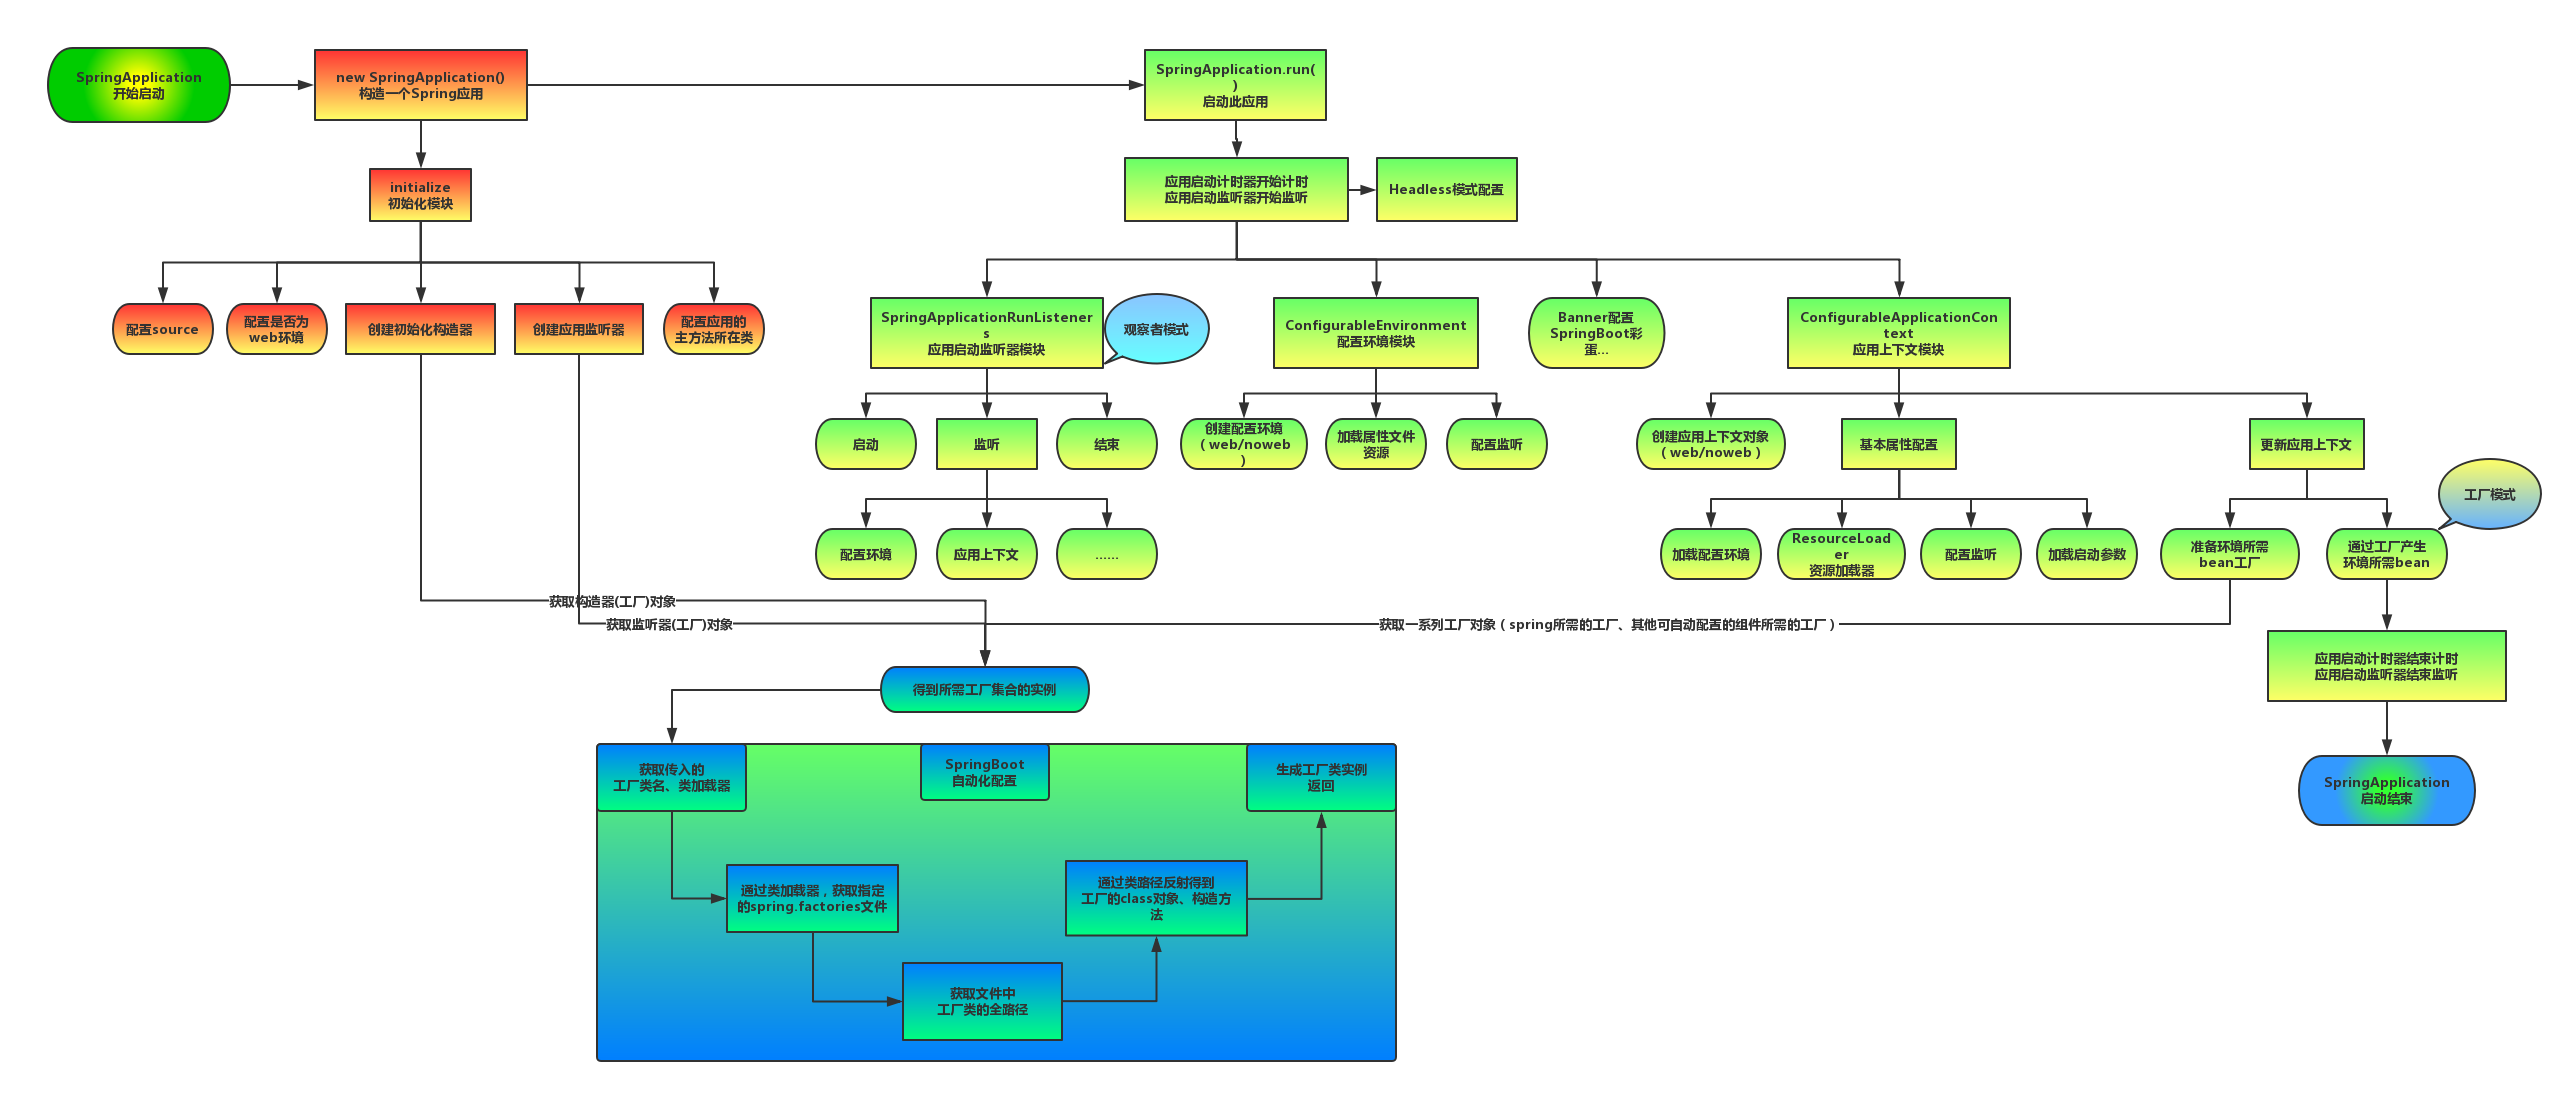
四个步骤
启动 Spring 应用上下文,初始化所有的 Spring 组件和依赖注入。
启用自动配置,根据项目的依赖自动配置应用所需的 Bean 和配置。
启动嵌入式服务器,使得应用可以直接运行,不依赖外部服务器。
管理外部配置,从配置文件、环境变量等地方加载应用的配置。
简化开发,通过
@SpringBootApplication注解减少手动配置。
2.Spring自动配置
1.Condition
案例
RedisTemplate
Condition 是在Spring 4.0 增加的条件判断功能,通过这个可以功能可以实现选择性的创建 Bean 操作。
Spring Boot 的自动配置依赖于
@EnableAutoConfiguration注解,它会自动加载并配置合适的 Bean。Spring Boot 内部通过spring.factories文件定义了一系列的自动配置类,当应用启动时,这些配置类会被加载。
SpringBoot是如何知道要创建哪个Bean的?比如SpringBoot是如 何知道要创建RedisTemplate的
1 | |
–
条件配置的实现:@Conditional
Spring Boot 使用了 @Conditional 注解来实现基于条件的自动配置。RedisAutoConfiguration 是 Spring Boot 为 Redis 提供的自动配置类,它的配置是有条件的。条件配置通过 @ConditionalOnClass、@ConditionalOnMissingBean 等注解实现。
案例实现
关键条件注解:
- @ConditionalOnClass:当指定的类在类路径中存在时,才会执行配置。对于 Redis 来说,只有在 Redis 相关的类(如
RedisTemplate、JedisConnectionFactory等)存在时,Spring Boot 才会去配置它们。 - @ConditionalOnMissingBean:如果 Spring 上下文中没有指定的 Bean,才会创建新的 Bean。
- @ConditionalOnProperty:根据配置属性(通常在
application.properties或application.yml中)是否存在或其值来决定是否创建 Bean。
1 | |
加载自动配置类:
@EnableAutoConfiguration会在 Spring Boot 启动时加载RedisAutoConfiguration类(通过spring.factories注册)。检查条件:
@ConditionalOnClass(RedisTemplate.class):检查类路径中是否有RedisTemplate类。如果 Redis 依赖存在,类路径中会包含此类,条件成立。@ConditionalOnBean(RedisConnectionFactory.class):检查 Spring 容器中是否已经有RedisConnectionFactory。如果条件满足(通常会通过自动配置或手动配置创建RedisConnectionFactory),继续执行。创建 RedisTemplate:如果条件成立,且没有手动定义
RedisTemplateBean,那么自动配置将为你创建一个默认的RedisTemplate。
2.@Enable*注解
@Enable 开头的注解在 Spring Boot 中非常常见,主要用于启用某些功能或模块。它们的核心原理是使用 @Import 注解来导入配置类或其他需要的 Bean,从而实现功能的动态开启。
@Enable*注解的核心原理
@Import注解:@Enable开头的注解通常内部会使用@Import,其作用是将指定的配置类或相关的组件导入到 Spring 容器中,参与 Bean 的定义和管理。- 配置类或自动配置:这些
@Enable注解导入的通常是特定功能模块的配置类,可能包含多个 Bean 的定义,用来开启该模块的相关功能。例如@EnableScheduling用于启用 Spring 的定时任务功能,其底层导入了与任务调度相关的配置类。- 实现动态 Bean 加载:通过
@Enable注解启用的功能是动态的,不需要手动在配置文件中去定义。注解本身相当于一个开关,当添加到某个类上时,会加载对应的配置,注册相关的 Bean。
常见注解
1 | |
底层工作机制
当使用
@Enable*注解时,Spring 会扫描并导入指定的配置类,这些类通常会包含必要的 Bean 定义和配置。@Import注解可以导入普通的 Java 配置类,也可以导入ImportSelector或ImportBeanDefinitionRegistrar,后者可以提供更为灵活的控制和动态 Bean 注册。通过这种机制,开发者可以非常方便地启用所需的功能,而不需要手动编写大量的配置代码。
1 | |
3.Import注解
@Enable*底层依赖于@Import注解导入一些类,使用@Import导入的类会被Spring加载到IOC容器中。而@Import提供4中用 法:
导入普通的 Bean 类:最简单的用法是直接将某个类通过
@Import导入到 Spring IOC 容器中,Spring 会自动将该类作为 Bean 进行管理。
2
3
4
5
6
7
8
9
10
11
12
13
14
15
16
17
18
19
20
21
22
23
24
25
26// 普通的类
public class MyService {
public String sayHello() {
return "Hello, Spring!";
}
}
// 使用 @Import 导入类
@Configuration
@Import(MyService.class)
public class AppConfig {
}
// 使用 MyService 的类
@RestController
public class MyController {
private final MyService myService;
public MyController(MyService myService) {
this.myService = myService;
}
@GetMapping("/hello")
public String hello() {
return myService.sayHello();
}导入配置类:可以通过
@Import导入一个配置类(通常带有@Configuration注解的类)。该配置类中的 Bean 定义会被 Spring 自动加载。
2
3
4
5
6
7
8
9
10
11
12
13
14
15
16
17
18
19
20
21
22
23
24
25
26
27
28
29
30// 配置类
@Configuration
public class ServiceConfig {
@Bean
public MyService myService() {
return new MyService();
}
}
// 使用 @Import 导入配置类
@Configuration
@Import(ServiceConfig.class)
public class AppConfig {
}
// 使用 MyService 的类
@RestController
public class MyController {
private final MyService myService;
public MyController(MyService myService) {
this.myService = myService;
}
@GetMapping("/hello")
public String hello() {
return myService.sayHello();
}
}导入
ImportSelector实现类:ImportSelector是一个接口,用于根据特定逻辑返回一组类名,Spring 会将这些类导入到容器中。这种方式通常用于根据条件动态地加载多个配置类或组件。通过实现ImportSelector,你可以基于某些条件(如配置文件、依赖关系等)来决定哪些类需要被加载。
AutoConfigurationImportSelector就是一个典型的ImportSelector实现类,它根据META-INF/spring.factories文件中的配置来决定哪些自动配置类需要被导入。**
importingClassMetadata**:代表的是使用@Import(MyImportSelector.class)注解的类的元数据。你可以通过它来获取导入这个ImportSelector的类的所有注解信息,包括该类上的注解、注解属性值等。@Retention(RetentionPolicy.RUNTIME) @Target(ElementType.TYPE) public @interface EnableFeatureX { boolean enable() default true; }
2
3
4
5
6
7
8
9
10
11
12
13
14
15
16
17
18
```java
public class MyImportSelector implements ImportSelector {
@Override
public String[] selectImports(AnnotationMetadata importingClassMetadata) {
// 获取使用 @EnableFeatureX 注解的类上的注解属性
Map<String, Object> attributes = importingClassMetadata.getAnnotationAttributes(EnableFeatureX.class.getName());
boolean enable = (Boolean) attributes.get("enable");
// 根据注解属性值决定要导入的类
if (enable) {
return new String[]{FeatureXService.class.getName()};
} else {
return new String[]{};
}
}
}
2
3
4
5@Configuration
@EnableFeatureX(enable = true)
@Import(MyImportSelector.class)
public class AppConfig {
}
在这个例子中,importingClassMetadata 允许你获取 @EnableFeatureX 注解的属性值,从而根据注解的配置动态决定是否导入 FeatureXService 类。导入
ImportBeanDefinitionRegistrar实现类:ImportBeanDefinitionRegistrar接口用于以编程的方式注册 Bean 定义,允许开发者手动控制 Bean 的注册过程,而不需要依赖注解或自动扫描。这提供了极大的灵活性。
2
3
4
5
6
7
8
9
10
11
12
13
14
15
16
17
18
19
20
21
22
23
24
25
26
27
28
29
30// 自定义 ImportBeanDefinitionRegistrar 实现类
public class MyBeanDefinitionRegistrar implements ImportBeanDefinitionRegistrar {
@Override
public void registerBeanDefinitions(AnnotationMetadata importingClassMetadata, BeanDefinitionRegistry registry) {
BeanDefinitionBuilder beanDefinitionBuilder = BeanDefinitionBuilder.genericBeanDefinition(MyService.class);
registry.registerBeanDefinition("myService", beanDefinitionBuilder.getBeanDefinition());
}
}
// 使用 @Import 导入 ImportBeanDefinitionRegistrar
@Configuration
@Import(MyBeanDefinitionRegistrar.class)
public class AppConfig {
}
// 使用 MyService 的类
@RestController
public class MyController {
private final MyService myService;
public MyController(MyService myService) {
this.myService = myService;
}
@GetMapping("/hello")
public String hello() {
return myService.sayHello();
}
}
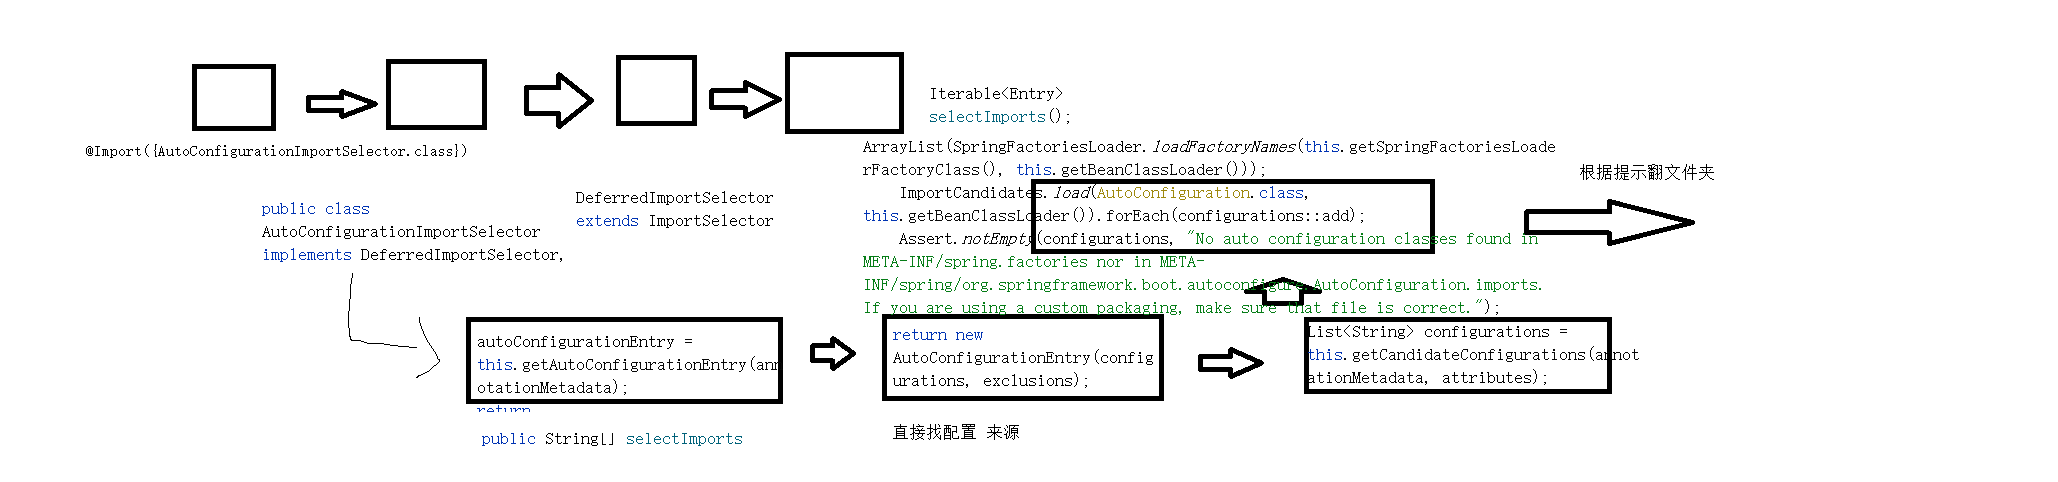
4.启动自动配置流程
启动类探究
1 | |
进入启动依赖
1 | |
@EnableAutoConfiguration
1 | |
AutoConfigurationImportSelector->返回全类名
1 | |
1 | |
3.Springboot监听机制
Java 监听机制 SpringBoot 的监听机制,其实是对Java提供的事件监听机制的封装。 Java中的事件监听机制定义了以下几个角色:
① 事件:Event,继承 java.util.EventObject 类的对象
② 事件源:产生事件的对象,通常是任意类型的 Java 对象
③ 监听器:实现 java.util.EventListener 接口的类,用来监听和处理事件。
SpringBoot 在项目启动时,会对几个监听器进行回调,我们可以实现这些监听器接口,在项目启动时完成 一些操作。 ApplicationContextInitializer、SpringApplicationRunListener、CommandLineRunner、ApplicationRunner
案例:ApplicationContextInitializer
该接口允许在 ApplicationContext 刷新之前进行自定义初始化操作。通过实现这个接口,你可以在 Spring 上下文创建前对其进行配置。
1 | |
Springboot自动装配探究
1.开始
概述 :某些对象自动存入IOC容器
例子
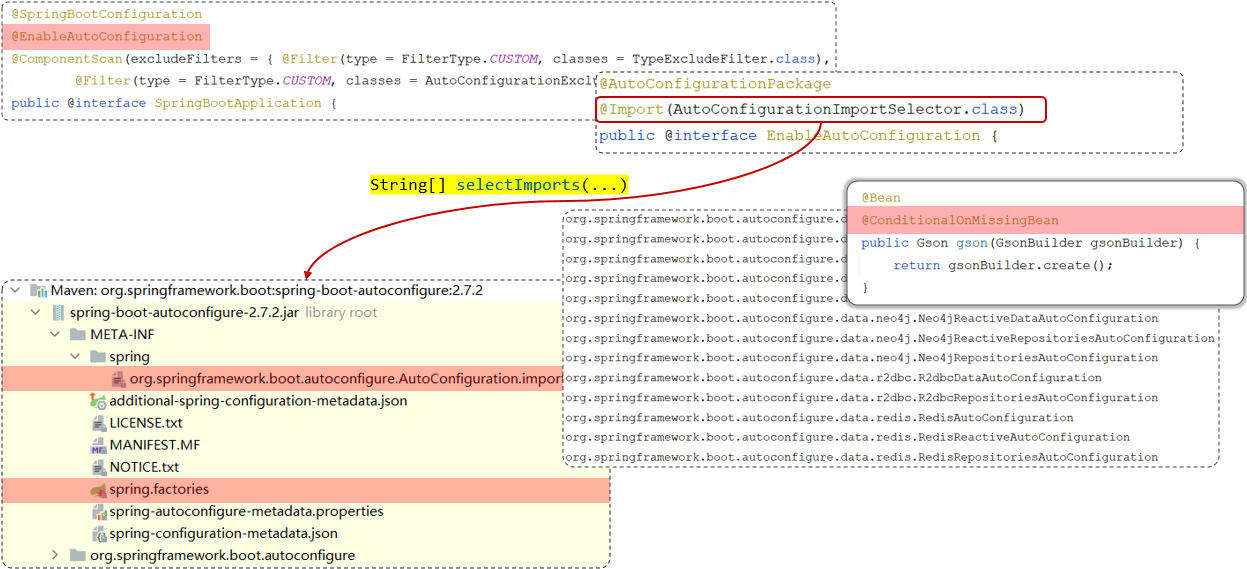
比如:配置类GsonAutoConfiguration里面有一个bean,bean的名字叫gson,它的类型是Gson。 ->专门用来处理json数据
1 | |
此处 我们没有手动将该gson对象放入ioc容器 但他确可以拿出来 这就是spring在启动时候 就完成了bean对象的创建
其实分析自动配置原理就是来解析在SpringBoot项目中,在引入依赖之后是如何将依赖jar包当中所定义的配置类以及bean加载到SpringIOC容器中的。
2.自写自动装配
1.问题发现
javen jar包
1 | |
`
报错 表示容器内没有找到这个bean
- 原因在我们之前讲解IOC的时候有提到过,在类上添加@Component注解来声明bean对象时,还需要保证@Component注解能被Spring的组件扫描到。
- SpringBoot项目中的@SpringBootApplication注解,具有包扫描的作用,但是它只会扫描启动类所在的当前包以及子包。
- 当前包:com.itheima, 第三方依赖中提供的包:com.example(扫描不到)
2.两种解决方法
解决方法
- 方案1:@ComponentScan 组件扫描
- 方案2:@Import 导入(使用@Import导入的类会被Spring加载到IOC容器中
方案一 指定扫描
@ComponentScan({“com.example.program”,”com.example”})
但是每一个依赖包都要指定对应目录 太过麻烦 对此 进行方案2
@Import导入的三种方法
1.普通类
1 | |
2.配置类
1 | |
3.使用@Import导入ImportSelector接口实现类:
1 | |
你所提供的代码是Spring中ImportSelector接口的一个实现。ImportSelector接口是Spring的@Import注解处理的一部分,它允许我们动态加载(或导入)一些Spring的配置。
MyImportSelector类实现ImportSelector接口的selectImports方法,这个方法的作用是返回一个包含希望Spring加载的类全限定名称的字符串数组。
在你的例子中,selectImports方法返回一个字符串数组,包含一个元素”com.example.HeaderConfig”。这表示Spring会尝试将com.example.HeaderConfig这个类加载到Spring的应用上下文中。
如图-三种方法都可以进行依赖注入
第三方依赖探究
如果基于以上方式完成自动配置,当要引入一个第三方依赖时,是不是还要知道第三方依赖中有哪些配置类和哪些Bean对象?
思考:当我们要使用第三方依赖,依赖中到底有哪些bean和配置类,谁最清楚?
- 答案:第三方依赖自身最清楚。
结论:我们不用自己指定要导入哪些bean对象和配置类了,让第三方依赖它自己来指定。‘’
怎么让第三方依赖自己指定bean对象和配置类?
- 比较常见的方案就是第三方依赖给我们提供一个注解,这个注解一般都以@EnableXxxx开头的注解,注解中封装的就是@Import注解
使用第三方依赖提供的 @EnableXxxxx注解
@Retention(RetentionPolicy.RUNTIME)
@Target(ElementType.TYPE)
@Import(MyImportSelector.class)//指定要导入哪些bean对象或配置类
public @interface EnableHeaderConfig {
}
前两个注解详解
@Retention: 这个注解决定了被修饰的注解信息在什么级别可用。
    RetentionPolicy.SOURCE:注解只保留在源码中,编译时会被丢弃,不会写入字节码。
    RetentionPolicy.CLASS:注解在编译时被保留在字节码中,但JVM加载类时不会将其加载到反射数据中,这是默认的生命周期。
    RetentionPolicy.RUNTIME:注解在编译后也会被保存在字节码中,JVM加载类时将其加载到反射数据中,所以它们能在运行时被读取到。

因此,@Retention(RetentionPolicy.RUNTIME)意味着被修饰的注解在运行时仍然有效,可以通过反射机制读取到。

@Target: 这个注解用来指定被修饰的注解可以用在哪些元素上。元素类型包括:CONSTRUCTOR(构造器声明),FIELD(字段声明),LOCAL_VARIABLE(局部变量声明),METHOD(方法声明),PACKAGE(包声明),PARAMETER(参数声明), TYPE(类、接口或枚举声明)等。

所以,@Target(ElementType.TYPE)表示被修饰的注解只能用来修饰类、接口或枚举。
以上四种方式都可以完成导入操作,但是第4种方式会更方便更优雅,而这种方式也是SpringBoot当中所采用的方式。
1 | |
1 | |
如上-跟踪自动装配的依赖
1 | |
在META-INF/spring/org.springframework.boot.autoconfigure.AutoConfiguration.imports配置文件中指定了第三方依赖Gson的配置类:GsonAutoConfiguration
1 | |
1 | |
—这就是要加入ioc容器的类
这么多 不会累坏吗 spring怎么知道哪些要加入哪些不加入呢
org.springframework.boot.autoconfigure.gson.GsonAutoConfiguration
1 | |
条件注解详解
@Configuration
public class HeaderConfig {
1 | |
理就是在配置类中定义一个@Bean标识的方法,而Spring会自动调用配置类中使用@Bean标识的方法,并把方法的返回值注册到IOC容器中。
@ConditionalOnMissingBean //不存在该类型的bean,才会将该bean加入IOC容器
@ConditionalOnMissingBean(name=”deptController2”)//不存在指定名称的bean,才会将该bean加入IOC容器
@ConditionalOnMissingBean(HeaderConfig.class)//不存在指定类型的bean,才会将bean加入IOC容器
@ConditionalOnProperty(name =”name”,havingValue = “itheima”)//配置文件中存在指定属性名与值,才会将bean加入IOC容器
总结
总结-从启动类依赖开始找->自动装配依赖->自动装配依赖类的依赖->这个依赖的参数_>selectImport函数->配置代码
1 | |
这个过程就是spirng-boot-再启动的时候->会依据配置文件 去读取加载的Bean
bean中又包含了条件创建bean的结构
@Bean
@ConditionalOnMissingBean//条件注解 这意味着只有当Spring容器中不存在类型为Gson 的Bean时,该方法返回的实例才会被注册为Bean
public Gson gson(GsonBuilder gsonBuilder) {
return gsonBuilder.create();
}